Correct Answer: A
1.
In the EAC, navigate to Mail flow > Send connectors, and then click Add +. This starts the New Send connector wizard.
2.
On the first page, enter the following information:
-Name: Enter a descriptive name for the Send connector, for example, Smart host to Internet.
-Type: Select a descriptive value. For example, Internet or Custom.
When you're finished, click Next.
3.
On the next page, select Route mail through smart hosts, and then click Add +. In the Add smart host dialog box that appears, identify the smart host by using one of the following values:
-IP address: For example, 192.168.3.2.
-Fully qualified domain name (FQDN): For example, securitydevice01.contoso.com. Note that the Exchange source servers for the Send connector must be able to resolve the smart host in DNS by using this FQDN.
When you're finished, click Save.
4.
You can enter multiple smart hosts by repeating Step 3. When you're finished, click Next.
5.
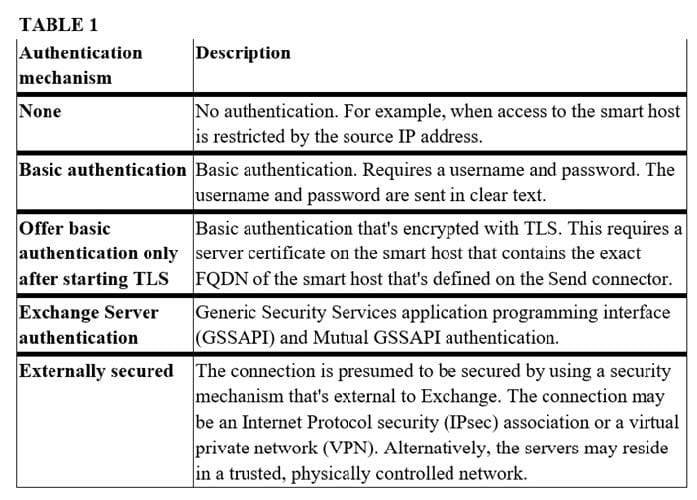
On the next page, in the Route mail through smart hosts section, select the authentication method that's required by the smart host. Valid values are:
6.
When you're finished, click Next.
7.
On the next page, in the Address space section, click Add +. In the Add domain dialog box that appears, enter the following information:
-Type: Verify SMTP is entered.
-Fully Qualified Domain Name (FQDN): Enter an asterisk (*) to indicate the Send connector applies to messages addressed to all external domains. Alternatively, you can enter a specific external domain (for example, contoso.com), or a domain and all subdomains (for example, *.contoso.com).
-Cost: Verify 1 is entered. A lower value indicates a more preferred route for the domains you specified. When you're finished, click Save.
8. Back on the previous page, the Scoped send connector setting is important if your organization has Exchange servers installed in multiple Active Directory sites:
-If you don't select Scoped send connector, the connector is usable by all transport servers (Exchange 2013 or later Mailbox servers and Exchange 2010 Hub Transport servers) in the entire Active Directory forest. This is the default value.
-If you select Scoped send connector, the connector is only usable by other transport servers in the same Active Directory site.
When you're finished, click Next.
9. On the next page, in the Source server section, click Add +. In the Select a Server dialog box that appears, select one or more Mailbox servers that you want to use to send outbound mail to the smart host. If you have multiple Mailbox servers in your environment, select the ones that can route mail to the smart host. If you have only one Mailbox server, select that one. After you've selected at least one Mailbox server, click Add, click OK, and then click Finish.
After you create the Send connector, it appears in the Send connector list.
From the Send connector list, you can turn the connector on or off.
Reference: https://docs.microsoft.com/en-us/exchange/mail-flow/connectors/outbound-smart-host-routing?view=exchserver-2019#how-do-you-know-this-worked